Cherry Almond Tea Cakes

Warm, nutty almond flavors pair with sweet-tart cherries in these delightful little tea cakes, that are sure to please everyone at your next spring gathering. If you’re looking for a sweet treat that’s easy to prepare, (and even easier to eat), look no further than these tasty, petite cakes!


Cherry Almond Tea Cakes
Makes about 16 tea cakes

Ingredients:

2 cups all-purpose flour
1/4 cup packed brown sugar
1/4 cup granulated sugar
2 teaspoons baking powder
1/2 teaspoon baking soda
1/2 teaspoon salt
6 tablespoons unsalted butter, extra cold and grated
1 cup fresh cherries, stemmed, pitted, and halved (enough to fill one cup)
4 oz chilled almond paste, finely chopped
1/2 cup whole milk
1/2 cup whole Greek yogurt
2 eggs
1 teaspoon almond extract
1/4 cup sliced almonds (optional, for topping)
Coarse sugar such as pearl sugar or sugar in the raw (optional, for topping)

Directions:

1. Preheat the oven to 425 degrees F.

2. Measure and mix all of the dry ingredients together (flour, sugars, baking powder, baking soda, and salt) in a large bowl. In a food processor, pulse the dry ingredients a couple of times to mix the dry components.

3. Grate very cold butter with a coarse grater. Add the grated butter to the flour mixture in the food processor and pulse a few times until a coarse crumb results.4. Transfer the butter-flour mix to a large mixing bowl. Add the cherries and chopped almond paste to the dry mixture, and gently fold until evenly distributed.

5. In a medium bowl, whisk the wet ingredients (milk, Greek yogurt, egg, and almond extract) until well combined.

6. Add the liquid mixture all at once to the dry ingredients. Mix using a folding motion with a large spatula until a thick batter is created.

7. Evenly distribute the batter into a greased mini scone, bundtlette, or cakelet pan. If using a scone pan, brush tops with the remaining egg (whisked) and top with the sliced almonds and coarse sugar before baking. Bake for 13-15 minutes or until the edges begin to turn a golden brown, and a knife inserted in the center comes out cleanly.

8. Remove the tea cakes from the oven and let them sit for a few minutes before removing them from the pan. Enjoy with tea or coffee while still slightly warm.

Notes:

Tea cakes may be stored for 1-2 days (though best when fresh), or wrapped in an airtight container in the freezer for 2-3 months.

If desired, the batter may be prepared and stored in the refrigerator overnight, and freshly baked in the morning.

Spring White Bean Soup with Mushrooms, Asparagus and Fried Shallots

Fresh, springtime vegetables and creamy white beans bathe in an umami-packed broth, making this vegetarian soup both savory and satisfying. Roasted herbs and mushrooms add depth, while the crispy shallot topping introduces a delightfully subtle crunch.


Spring White Bean Soup with Mushrooms, Asparagus and Fried Shallots
Serves 8

Ingredients:

8 oz shiitake mushrooms
6 oz cremini mushrooms
2 oz oyster mushrooms
2 tablespoons olive oil
2 teaspoon salt, divided
1 teaspoon freshly cracked black pepper
1 large or 2 small leeks
1 tablespoon unsalted butter
3 cloves garlic, minced
8 cups vegetable stock
1 Parmesan cheese rind
2 bay leaves
1 rosemary sprig
2 cans (15.5 oz each) cannellini beans
1 cup frozen peas, thawed
6 stalks asparagus, sliced on the bias
1/4 cup canola oil
5 shallots, finely sliced into ringswith a mandoline
Additional salt and pepper to taste

Directions:

1. Preheat the oven to 425 degrees F.

2. Toss the shiitake, cremini, and oyster mushrooms in olive oil, sprinkle with 1 teaspoon salt, and spread the mushrooms evenly on a rimmed baking sheet. Roast for 25-30 minutes, stirring halfway through, until the mushrooms have fully wilted, golden, and becoming sticky on the edges.

3. Clean the leek by cutting off the root and the greens. Chop the leek and place the leek pieces in a bowl filled with cold water. Using your hands, agitate the leeks to remove any dirt or sand hiding in the layers. Remove the leeks with a slotted spoon, and pat dry. Discard the dirty water.

4. In a large Dutch oven over medium low heat, melt the butter and cook the leek and the minced garlic, stirring occasionally until the leek is tender, 5-8 minutes. Remove the mushrooms from the oven. Add the mushrooms, vegetable stock, Parmesan rind, bay leaves, rosemary sprig, and remaining salt, and the pepper. Cover and increase the heat to high, boiling for 3-5 minutes until flavors are incorporated.

5. Add the cannellini beans, peas, and asparagus to the pot, and simmer over low heat for 5-10 minutes, or until the asparagus is tender. Remove and discard the Parmesan rind, bay leaves, and rosemary sprig.

6. While the soup simmers, cook the shallots in a shallow skillet. Heat the canola oil in the skillet over medium-high heat. Once hot, add the rings of shallot. Fry for 3-5 minutes, or until the shallots are just golden brown and starting to become crispy. (They will continue to brown after being removed from the the oil). Remove with a slotted spoon, place on a paper towel-lined plate, and sprinkle with salt.

7. Ladle the soupinto bowls, top with the crispy shallots. Add salt and pepper to taste.

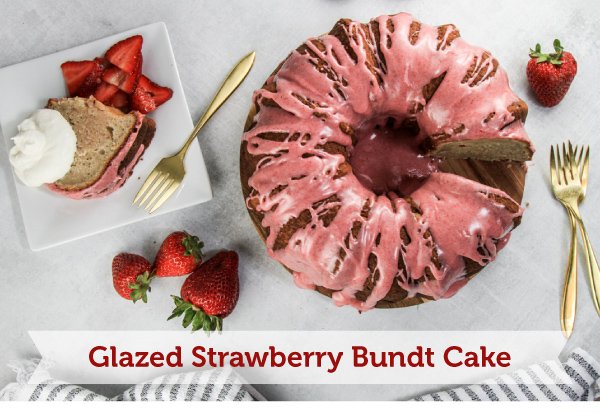
Glazed Strawberry Bundt Cake

This strawberry bundt cake is moist and bursting with fresh strawberry flavor! The glaze, made pink and flavorful with freeze-dried strawberries, is both sweet and tart all at once. Serve with whipped cream and freshly sliced strawberries for a wonderful taste of spring in each bite.


Glazed Strawberry Bundt Cake
Makes one cake - Serves 10 - 12

CAKE INGREDIENTS:

10 fresh large strawberries, pureed until smooth
1-1/2 cups granulated sugar
1 tablespoon lemon zest
1 tablespoon fresh lemon juice
1 cup (2 sticks) unsalted butter
4 large eggs
1-1/2 teaspoons vanilla extract
1 cup sour cream
3 cups all-purpose flour
1 tablespoon baking powder
1/2 teaspoon Kosher salt

GLAZE INGREDIENTS:

2 cups powdered sugar
3 tablespoons whole milk
1 cup of freeze-dried strawberries, blended into a powder and the seeds sifted out

TOPPINGS:

1 cup strawberries, stems removed and sliced
2 tablespoons granulated sugar
Whipped cream, if desired

WHIPPED CREAM INGREDIENTS:

1 cup cold heavy whipping cream
1/4 cup powdered sugar
1/2 teaspoon vanilla extract

Directions:

1. Preheat the oven to 350 degrees F. Grease and flour a 12-cup bundt pan, tapping out any excess flour as needed. (Or, for an easy solution, spray with a baking spray that has flour included.)

2. In a stand mixer outfitted with the paddle attachment, cream the butter, sugar, and lemon zest together on medium-high speed until the mixture is fully combined, about 3-5 minutes. Scrape down the sides of the bowl as needed, to ensure even mixing.

3. Reduce the speed to low and slowly add the eggs, lemon juice, vanilla extract, sour cream, and pureed strawberries and mix until all of the ingredients are fully combined.

4. In a separate bowl, sift together the flour, baking powder, and salt. Whisk until evenly distributed. Gradually add the dry ingredients to the wet ingredients, mixing on medium speed until fully combined.

5. Pour the cake batter into the prepared bundt pan, using a spatula to smooth the top surface. Bake for 55-60 minutes or until the cake is golden brown and a toothpick comes out mostly clean when inserted -- displaying only a few soft, lingering crumbs.

6. While the cake bakes, macerate the sliced strawberries in a small bowl by tossing with the sugar. Cover and refrigerate. The sweetened fruit will be ready for use when it’s time to serve the cake.

7. Once fully baked, cool the cake in the pan on a cooling rack for about 15 minutes, then carefully flip the bundt pan onto the wire rack. Allow the cake to cool completely before adding the glaze.

8. Make the glaze by combining the powdered sugar, whole milk, and sifted powder from the freeze-dried strawberries in a medium bowl and whisk until smooth. Drizzle the glaze over the cake using a whisk and let stand for about 15 minutes to allow the glaze to set.

9. Make the whipped cream topping. Using a stand mixer and chilled bowl, whip the cream, powdered sugar, and vanilla extract together until stiff peaks form.

10. Slice and serve the cake with the fresh strawberries and whipped cream.

Classic Potato and Caramelized Onion, Gruyère Gratin

Experience this classic potato presentation -- thinly sliced potatoes layered with a distinctive Mornay sauce (a Béchamel sauce with Gruyère cheese added). The addition of savory, caramelized onions and fresh thyme infuses comforting flavors into every bite.


Classic Potato and Caramelized Onion, Gruyère Gratin
Serves 6 - 8

Ingredients:

2 tablespoons butter
2 medium sweet onions, sliced pole to pole
1 teaspoon fresh thyme leaves
2 lbs Russet potatoes (about 2-3 medium to large potatoes), washed, peeled, and thinly sliced with a mandoline
3 cloves garlic, minced

Mornay Sauce Ingredients:

4 tablespoons butter
1/4 cup all-purpose flour
3 cups whole milk
1-1/2 teaspoons Kosher salt
1/4 teaspoon black pepper
2 cup grated Gruyère, 1/4 cup reserved for topping the gratin

Directions:

1. Prepare the caramelized onions. In a large skillet or sauté pan, melt 2 tablespoons of butter and sauté the sliced onions over medium heat. Once the onions start sweating, turn the heat down to medium-low. Stir the onions occasionally, as needed. Allow them to cook slowly for 35-45 minutes until a deep brown color is formed and they become fully caramelized. Add the garlic and cook for another 2-3 minutes. Add the thyme leaves and stir allowing the fragrance to bloom.

2. While the onions cook, prep the potatoes. Use a sharp peeler to peel the potatoes. Rinse off, then slice into 1/8” thick slices using a handheld mandoline.

3. Preheat the oven to 400 degrees F.

4. Prepare the roux. In a separate, smaller saucepan, heat the remaining 4 tablespoons of butter. Once the butter has melted, add the flour and whisk continuously until the mixture is completely smooth, as it cooks for about 1 - 2 minutes. This process removes the raw flour flavor and helps create a silky sauce.

5. Create a Béchamel sauce by very slowly pouring milk into the roux. Continue whisking the mixture until the sauce is smooth. Add in the salt and pepper and continue whisking over medium-low heat for 3-5 minutes or until the sauce thickens and becomes very creamy.

6. Remove from heat and transform the sauce into a Mornay sauce by slowly adding in the shredded Gruyère cheese. Whisk until the sauce is smooth, and the cheese is well incorporated. The sauce will continue to thicken while maintaining its creamy texture.

7. Layer the gratin. Butter the bottom and sides of a large baking dish and lay a single layer of potatoes, then a layer of caramelized onions. Pour some of the sauce over the potatoes and continue to layer the potatoes, onions, and sauce to form additional layers. Repeat this step until all of the potatoes are used (or until the layers reach within 1/2” from the top of the dish).

8. Top the final layer of potatoes with the remaining onions, then sauce, and finally sprinkle with the reserved 1/4 cup of cheese.

9. Cover the gratin with a tight-fitting lid or foil and bake for 60 minutes. Remove the lid or foil, and continue to bake for another 10 minutes, or until the top turns golden brown and the gratin is hot and bubbling.

10. Garnish with additional fresh stems of thyme, and serve while hot.

Carrot Cake with Cream Cheese Frosting

Treat yourself to this goodie-packed, flavor-filled, carrot cake topped with a decadent cream cheese frosting! The cake is moist and filled with comforting spices and complementary flavors. The shredded carrots and crushed pineapple lend a sweet flavor while the pecans and coconut add lovely depth and texture.


Carrot Cake with Cream Cheese Frosting
Serves 12

Cake Ingredients:

3 cups finely shredded carrots (about 4 carrots)
3 cups all-purpose flour
2 teaspoon baking soda
1 teaspoon baking powder
1/2 teaspoon salt
2 teaspoons ground cinnamon
1/2 teaspoon ground ginger
1/2 teaspoon ground nutmeg
4 eggs, beaten
1/2 cup granulated sugar
1-1/4 cups brown sugar, packed
1/4 cup sour cream
1/4 cup unsweetened applesauce
3/4 cup crushed pineapple, drained
1 teaspoon vanilla extract
1 cup vegetable oil1 cup finely chopped pecans
1 cup shredded sweetened coconut

Cream Cheese Frosting:

1-1/2 packs of cream cheese (12 oz), room temperature
1 cup butter, room temperature
1 teaspoon vanilla extract
4 cups powdered sugar
1/4 teaspoon salt

Directions:

1. Preheat the oven to 350 degrees F.

2. Prepare three round 8-inch cake pans by spraying with baking spray, lining with a parchment round, then spraying again for foolproof removal once baked.

3. Finely grate the carrots using a food processor or a handheld grater. If using a food processor, grate the carrots, then pulse a few more times to make an extra fine texture. Don’t over pulse -- the carrots could turn into juice!

4. In a mixing bowl, mix together the flour, baking soda, baking powder, salt, cinnamon, ginger, and nutmeg. Set aside.

5. In a separate mixing bowl, whisk together the eggs with the sugar, brown sugar, sour cream, applesauce, crushed pineapple, vanilla extract, and oil. Whisk until fully combined and fluffy. Add in the grated carrots and stir until well-mixed.

6. Combine the dry ingredients with the wet ingredients and mix until just combined. Don't over mix: this will create a too dense cake. Gently fold in the chopped pecans and shredded coconut.

7. Evenly pour the cake batter into the three prepared pans.

8. Bake for 25-28 minutes or, until a wooden toothpick pierced in the center comes out clean.

9. Allow the cakes to cool in the pans on a wire cooling rack for 15-20 minutes, then carefully remove the cakes from the pans, and continue to cool on the wire cooling rack. Allow the cakes to cool completely before frosting.

10. While the cakes are baking and cooling, prepare the frosting. Using a stand mixer or hand mixer, beat the room temperature cream cheese and butter together for about 2-3 minutes until it’s very smooth.

11. Add in the vanilla extract, salt, and powdered sugar. Continue mixing until the frosting is fluffy and reaches the desired texture for frosting. For a stiffer frosting, continue adding powdered sugar in 2 tablespoon increments until the desired consistency is reached.

12. Frost and stack the cooled cakes with frosting using a frosting knife. Add toasted coconut on the sides, if desired.

13. Store the cake in an airtight container in the refrigerator, and enjoy within 2 days.

Thin Crust Pizza with Fresh Mozzarella, Chicken Sausage, Red Onion & Basil

Pizza is loved by everyone for a reason -- it’s so tasty! Try our recipe for an overnight pizza dough for the ultimate crispy, yet chewy thin-crust pizza experience. Practice patience as the dough rests, then enjoy how easily the final pizzas come together. Enjoy your handcrafted pizzas with our suggested toppings, or experiment with your own. It's a pizza party!


Thin Crust Pizza with Fresh Mozzarella, Chicken Sausage, Red Onion & Basil
Makes three 10-12" pizzas

Dough Ingredients:

1-1/2 cups warm water - 110 degrees F
1 packet of active dry yeast
1 teaspoon sugar
3-1/2 - 4 cups all-purpose flour
1 teaspoon Kosher salt
2 tablespoons olive oil

Sauce Ingredients:

1 can (14.5 oz) whole San Marzano tomatoes
1 clove garlic
1/2 teaspoon Kosher salt
1/2 teaspoon sugar
1/4 teaspoon balsamic vinegar

Topping Ingredients:

Shredded Parmesan cheese
Fresh mozzarella, sliced
Spicy Italian chicken sausage, sliced
Red onion, thinly sliced
Basil, chiffonade cut as garnish

Directions:

1. Measure and heat the water to 110 degrees F. Add the water to the bowl of a stand mixer and add the sugar. Sprinkle the yeast on top. . Allow the yeast to stand undisturbed for a few minutes. It's ready to use when when it looks slightly foamy on top.

2. While the yeast is dissolving and activating, measure out the olive oil, salt, and flour.

3. Add the olive oil and salt to the yeast and water. Add one cup of the flour and mix on low for two minutes. Slowly, add 3 cups of flour and mix until a dough ball forms. Remove the dough from the mixer and knead a few times on a flour-dusted work surface. Form the dough into a ball.

4. Place the dough in a bowl coated with olive oil, and cover the dough ball with a kitchen towel. Let it double in size -- about 30 minutes.

5. Transfer the dough to a floured surface and divide it into three even pieces. Knead each section of dough individually, adding a little bit of additional flour to the dough and the working surface, as needed, until each dough ball is smooth, and not too sticky. Dust the dough balls with more flour, and place on a large plate under plastic wrap. Let the dough balls rest overnight in the refrigerator.

6. After the dough rests overnight, remove the plate from the fridge, and let the dough come to room temperature -- about two hours.

7. Place a pizza stone or baking steel on the middle oven rack and preheat the oven to 475-500 degrees F. Preheating the oven will ensure that the stone will be hot and ready when it's time for the pizzas to bake. A hot, preheated pizza stone produces a crispy bottom crust.

8. Prepare the sauce. In a blender or food processor, or directly in the tomato can using an immersion hand blender, combine all of the sauce ingredients and blend until smooth.

9. Prepare the pizza toppings. Slice the fresh mozzarella, the chicken sausage, red onions, and basil.

10. Once the oven is preheated, get ready to stretch and assemble the pizzas! Select one ball of dough. With floured hands begin to flatten the ball into a round disc, about 8”- 12" in diameter, starting from the center and working outward to form a round crust. The top of the dough ball will remain on top through this process. Try stretching the dough with the back of your hand, and avoid making holes.

11. Once the dough is formed, place it on a piece of parchment paper placed on top of the pizza peel for easy transferring to the pizza stone once assembled. Spread a thin layer of sauce to within about 1 inch from the edge. Add a layer of shredded parmesan cheese, then a layer of fresh mozzarella cheese. Finish the pizza with sliced chicken sausage and thinly sliced red onions. Avoid overloading the pizza with too many toppings.

12. After adding the toppings, transfer the pizza to the oven using a pizza peel.

13. Bake the pizza until the cheese melts and the crust is golden brown. Remove from the oven. Remember to allow the pizza to cool a little before eating. Garnish with fresh basil and enjoy!

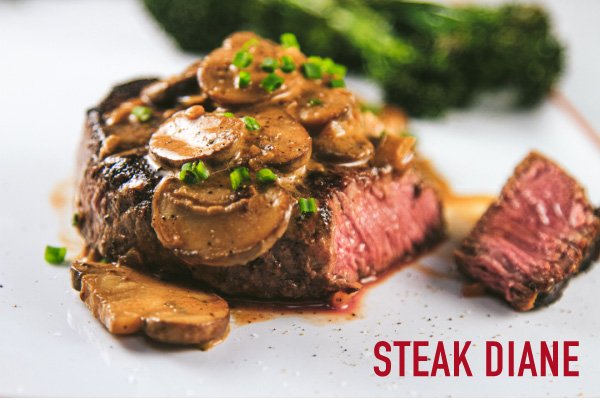
Steak Diane

Looking for a luxurious, romantic dinner for two? Try our version of the steakhouse classic, Steak Diane. To learn how to make a perfectly seared filet, and embellish it with a creamy, decadent mushroom sauce, read on! We were impressed -- you will be, too!


Steak Diane
Serves 2

Ingredients:

4 tablespoons butter, divided
1 tablespoon olive oil
2 tenderloin beef filets, lightly pounded to be 1-inch thick
Kosher salt and pepper
1/2 cup finely minced shallot
8 oz cremini mushrooms, sliced
2 tablespoons chives, sliced for garnish
1/4 cup cognac or brandy
1 tablespoon Worcestershire sauce
1 tablespoon Dijon mustard
1 teaspoon tomato paste
1 teaspoon lemon juice
1/2 cup beef broth
1/4 cup heavy whipping cream

Directions:

1. Using a layer of parchment paper and a meat mallet, slightly pound the steaks to be about 1-inch thick. Season the steaks generously with Kosher salt and pepper, and allow to set at room temperature for about 30 minutes before cooking.

2. Prepare the shallots by mincing. Brush off and slice the mushrooms. Ready the garnish by slicing the chives before starting the cooking.

3. Melt 2 tablespoons of butter and the olive oil in a cast iron skillet. Allow the oil and butter to heat. Once hot, add the steaks. Sear the steaks undisturbed for 2-3 minutes on each side. Continue to cook until the steak reaches the desired level of doneness. Remove the steaks from the pan, and let rest on a plate tented with foil while you prepare the sauce. (Remember, the steaks will continue to rise in temperature by a few degrees as they rest.)

4. Make the Sauce Diane. Add the remaining 2 tablespoons of butter to the skillet. Cook the mushrooms until browned on all sides. Add the shallot, and cook until translucent.

5. Add the cognac or brandy. Light the pan on fire if you desire some drama in the kitchen. Or, just let the brandycook down. Stir in the Worcestershire sauce, Dijon, tomato paste, lemon juice, and beef broth. Allow the sauce to simmer for about 5 minutes. Stir in the heavy cream and cook for another 2 minutes, or until the sauce thickens slightly. Taste the sauce, and adjust the seasonings with additional salt and pepper.

6. Serve the steaks with a generous serving of sauce. Garnish with chives.

Roasted Golden Beet Salad with Grapefruit, Pearl Couscous, Mint and a Honey-Lemon Vinaigrette

Winter citrus season is upon us! Enjoy sectioned grapefruit in this roasted golden beet salad mixed with pearl couscous, feta, and fresh mint leaves. The sweet-tart, honey-lemon vinaigrette ties all of the bright flavors together perfectly.


Roasted Golden Beet Salad with Grapefruit, Pearl Couscous, Mint and a Honey-Lemon Vinaigrette
Serves 4 - 6 as a side salad

Salad Ingredients:

3 golden beets, peeled and cut into
1/2-inch cubes
2 tablespoons olive oil,
1/2 teaspoon Kosher salt
1/2 teaspoon black pepper
1 cup pearl couscous
1 tablespoon olive oil (for couscous)
1 grapefruit, peeled and supremed to remove pith
10-20 mint leaves, chopped in strips (or if tiny, leave whole)
4 ounces feta, cubed

Honey-Lemon Vinaigrette Ingredients:

1 zest and juice of one small lemon (about 2 tablespoons of juice)1 tablespoon honey
3 tablespoons olive oil
Kosher salt, to taste
black pepper, to taste

Directions:

1. Preheat the oven to 450 degrees F. Prepare the beets by peeling, then dicing into 1/2-inch cubes. Toss the diced beets with 2 tablespoons olive oil, 1/2 teaspoon Kosher salt, and a healthy grind of pepper. Place the prepared beets in a single layer on a large roasting pan and roast for 15 minutes. Stir and continue roasting the beets for another 10-15 minutes, or until the beets are fork tender.

2. Meanwhile, prepare the couscous. In a small saucepan, coat the pearl couscous in 1 tablespoon of olive oil and toast until fragrant, about two minutes. Then cook according to the package's instructions.

3. While the couscous cooks, supreme the grapefruit by cutting away the outer peel of the grapefruit, then cutting each section away from the pith with a sharp paring knife inserted on either side of each section.

4. Dice the feta into 1/2-inch pieces. Chop the mint leaves into thin strips, or leave whole if the leaves are tiny.

5. In a small jar, whisk the vinaigrette ingredients together until combined.

6. Once the beets and couscous are prepared, toss together with the vinaigrette. Carefully mix in the sectioned grapefruit pieces, feta, and garnish with mint.

7. Serve as a side dish with your desired meat or fish dish.

Brown Rice Bowls with Soy Chorizo, Roasted Sweet Potatoes, Black Beans, Corn, Green Onion, and Avocado

We love starting the new year off with a protein-packed bowl full of nutritious fuel. This dish features a spicy chorizo made with soy, and is loaded with flavorful cilantro-lime brown rice, black beans, corn, roasted sweet potatoes, and avocados. YUM!


Brown Rice Bowls with Soy Chorizo, Roasted Sweet Potatoes, Black Beans, Corn, Green Onion, and Avocado
Makes 4 - 6 bowls

Ingredients:

12 oz chorizo made from soy
1 cup brown rice
2 cups vegetable stock
2 tablespoons olive oil Juice and zest of one lime, about 1/4 cup lime juice
2 tablespoons cilantro, chopped
2 medium (about 2 pounds) sweet potatoes, diced into 1/2-inch cubes
3 tablespoons olive oil1/
2 teaspoon cumin
1/2 teaspoon garlic powder
1/4 teaspoon paprika
1/4 teaspoon chili powder
1/4 teaspoon cayenne
1 teaspoon Kosher salt
1/4 teaspoon freshly ground pepper
1 can (15 oz) black beans, drained and rinsed
1 cup frozen corn, thawed
2 avocados, sliced
6 green onions, sliced

Garnishes:

Cilantro leaves
Sour cream, optional
Hot sauce, optional

Directions:

1. Preheat the oven to 450 degrees F.

2. Make the brown rice in a saucepan with a lid. Rinse the brown rice before cooking. Using a 2:1 liquid-to-grain ratio, cook the brown rice in vegetable stock (or lightly salted water) until tender, about 35-45 minutes. Once the rice is tender, fluff with a fork and mix with the lime juice, lime zest, and chopped cilantro.

3. Roast the sweet potatoes. Peel and dice the sweet potatoes into 1/2-inch cubes. Toss with 3 tablespoons of olive oil, the cumin, garlic powder, paprika, chili powder, and cayenne until coated. Roast for about 20-25 minutes, stirring halfway through. Roast until fork tender. Set aside until ready to assemble the bowls.

4. Cook the soy chorizo in a large skillet. Finely crumble when cooking until well-browned, then set aside until ready to assemble the bowls.

5. Drain and rinse the beans, and thaw the corn in the microwave in a small bowl. or in a skillet.

6. Slice the avocado, green onion, and chop more cilantro for garnish.

7. Load the bowls with all of the prepped ingredients and enjoy! Serve with a dollop of sour cream and a drizzle of hot sauce, if desired.

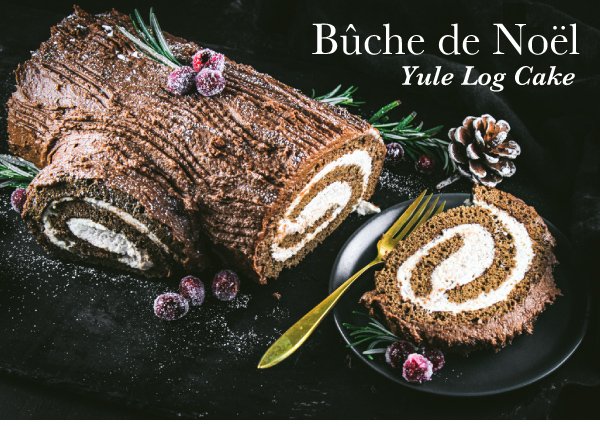
Bûche de Noël- Yule Log Cake

Looking for an impressive holiday cake? Try a Bûche de Noël, also known as a Yule Log Cake! This light, chocolatey sponge cake is rolled up with a thick layer of a rich, whipped cream and mascarpone filling. The presentation is elegantly finished with an espresso, chocolate buttercream. So beautiful and tasty! Happy Holidays to All!


Bûche de Noël - Yule Log Cake
Serves 8 - 10

Cake Ingredients:

Half sheet pan
Parchment paper
Cooking or baking spray
6 large eggs, separated
3 tablespoons unsalted butter, melted
3/4 cup all-purpose flour
1 teaspoon baking powder
1/4 cup unsweetened cocoa powder
3/4 cup sugar, divided
1/4 teaspoon Kosher salt

Filling Ingredients:

1 cup cold heavy whipping cream
1/4 cup powdered sugar
2 tablespoons brandy
1 teaspoon vanilla extract
8 ounces mascarpone

Chocolate Espresso Buttercream Ingredients:

1 stick butter
1 cup powdered sugar
2 tablespoons cocoa powder
1 tablespoon vanilla extract
1 tablespoon espresso
1 tablespoon heavy cream
Pinch of Kosher salt

Directions:

1. Prepare a rimmed half sheet baking pan, 12” x 17” x 1”, by spraying the bottom and sides lightly with baking spray, then line with parchment paper. Then, also spray the parchment paper lightly for super-easy removal later. Trim the paper lining and cut the corners so that the paper fits snugly in the pan. Preheat the oven to 375 degrees F.

2. Separate the eggs placing the egg yolks in a large mixing bowl, and the egg whites in the bowl of a stand mixer.

3. Using a stand mixer, whip the egg whites for 2 minutes. Slowly add 1/4 cup of sugar a little at a time until the egg whites reach the “stiff peaks” stage. Set aside.

4. Using a whisk, beat the egg yolks until lightened in color, about 2-3 minutes. Add the melted butter to the egg yolks slowly while whisking, then add the remaining 1/2 cup of sugar and beat until combined.

5. Fold in one-quarter of the whipped egg whites into the egg yolk mixture until evenly combined and the yolks are lightened. Add the remaining egg whites in two more portions; continue to fold (not stir) until any white streaks disappear.

6. In another medium-sized bowl, whisk the dry ingredients together – the flour, baking powder, cocoa powder, and salt. Add the flour mixture to the egg mixture by sprinkling on top and carefully folding until evenly combined.

7. Pour the batter into the prepared pan spreading to the edges until level. Bake for 10-12 minutes in a preheated oven – preheating is very important for this cake. The cake is done when the cake springs back from a light fingertip touch. Do not over-bake.

8. Remove the cake from the baking pan immediately by placing an un-rimmed baking sheet on top of the cake and inverting the baking pan.

9. Immediately place a clean kitchen towel over the cake and roll the cake into a log with the towel rolled inside beginning at the short side. Allow the cake to cool while wrapped up. This ‘wrapping-while-warm’ process keeps the cake from cracking too much when filling and re-rolling later.

10. Make the cake filling. Whip the cream in a stand mixer. Combine the whipping cream, powdered sugar, brandy, and vanilla extract and whip with a stand mixer until stiff peaks are formed. Once the cream is whipped, fold in the mascarpone until combined.

11. Once the cake has cooled completely, spread the filling on the cake. Unroll the rolled cake gently. (Resist the urge to flatten the cake if it's slightly curled, that's ok!) Spread the filling evenly over the cake to within an inch of the edges. A consistent, even layer of filling will yield the best spiral design once sliced. Carefully re-roll the cake (without the towel). Wrap the rolled cake in the towel or with plastic wrap, and chill in the refrigerator until ready to frost, up to one day ahead of time.

12. Prepare the chocolate espresso buttercream. In a stand mixer, beat the butter and powdered sugar until light yellow and creamy. Add the cocoa powder, vanilla extract, espresso, heavy cream, and a pinch of salt. Beat until well-combined and smooth. (Go ahead and take a little taste. Yum!)

13. Unwrap and plate the cake roll. Trim both ends to achieve a cleaner edge. If desired, make a "branch" for your log, or keep it as one solid log. Frost the outside with the buttercream, and add tree-trunk lines with a fork, if you'd like. Embellish as desired. Sugared cranberries or pomegranates could be used for a red pop with rosemary or other greenery. Dust lightly with powdered sugar.

14. Slice with a serrated knife into 3/4-inch thick slices. Serve and enjoy!

Chocolate-Dipped Cherry and Almond Cookies

These festive cookies feature a fabulous flavor combination of chocolate and cherry in buttery shortbread. We’re certain that they will become an instant holiday favorite! Chewy, dried cherries and crunchy almond bits also introduce textural interest alongside the crumbly shortbread and rich chocolate coating. We are already dreaming about the next batch!


Chocolate-Dipped Cherry and Almond Cookies
Makes 15 - 20 cookies

Ingredients:

2 cups all purpose flour + 2 tablespoons
1/2 teaspoon salt
1 cup salted butter, softened
1 cup powdered sugar
2 teaspoons almond extract
1/3 cup sliced almonds, 1 tablespoon reserved and finely chopped
1/3 cup dried cherries, finely chopped
6 oz semi-sweet chocolate baking chips
1 teaspoon coconut oil
1 tablespoon cherry syrup (from cocktail cherries)

Directions:

1. In a large bowl, whisk the flour and salt until combined.

2. In the bowl of a stand mixer with the paddle attachment, cream the butter and powdered sugar until light and fluffy, about 3-5 minutes. Mix in the almond extract for another minute to fully incorporate.

3. Use a spatula to scrape down the sides of the bowl. Reduce the speed to low and slowly add in the flour mixture to the butter until just incorporated. Do not over-mix! It should be a crumb consistency, yet easy stick together when pressed.

4. Finely chop the almonds and dried cherries and fold them into the doughuntil evenly combined.

5. Gather the dough and divide it in half. Place each half on a piece of plastic wrap and press firmly to form 2 logs. Wrap each log with the plastic wrap and refrigerate for 2 hours, (or up to overnight), until firm.

6. Once the dough is chilled, preheat the oven to 350 degrees F. Prepare two cookie sheets with parchment paper or non-stick baking mats.

7. Cut the dough into 1/4 inch thick slices and place the slices onto the prepared baking sheets and freeze for 15 minutes.

8. Remove from the freezer, bake for 10-12 minutes until the edges are just beginning to brown. Remove the cookies from the oven and cool completely on a wire rack.

9. In a microwave-safe bowl, melt the chocolate and coconut oil in the microwave, heating in 10 second increments stirring intermittently so that the chocolate doesn't burn. Once melted, stir in the cherry syrup and dip each cookie halfway into the chocolate to coat one half. Place each half-coated cookie on a baking sheet lined with wax paper. Sprinkle with additional chopped almonds. Place the baking sheet in the refrigerator for about 30 minutes to allow the chocolate to set.

10. Store the dipped cookies in the refrigerator to keep the chocolate from melting. Remove 10-20 minutes before serving.

Dark Chocolate Bourbon Pecan Bars

These sweet bars are guaranteed to be a hit! Starting with classic pecan pie flavors, the addition of dark chocolate takes these bars to a new level. The crunchy pecans, dark chocolate, and a final sprinkle of flake salt balances out the sweetness that typifies traditional pecan pie. Easy and quick to assemble, these bars are perfect for sharing during the holiday season ahead.


Dark Chocolate Bourbon Pecan Bars
Makes 12 large bars or 20 smaller bars

Ingredients: (for greasing the pan)

1 tablespoon butter1 tablespoon cocoa powder

Crust Ingredients:

1-1/2 cups all-purpose flour
1/4 cup powdered sugar
1/2 teaspoon salt
1/2 cup butter, softened
2 oz cream cheese, softened
1 tablespoon bourbon

Filling Ingredients:

3 large eggs
3/4 cup light corn syrup
1 cup packed brown sugar
1/4 cup butter, softened
2 tablespoons bourbon
1/2 teaspoon cinnamon
1 teaspoon vanilla extract
6 oz dark chocolate chips
2 cups pecan halves, chopped
1/2 teaspoon flake salt, for sprinkling

Directions:

1. Preheat the oven to 350 degrees F. Prepare a 9x13-inch baking pan by greasing it generously with 1 tablespoon of butter. Then, sprinkle 1 tablespoon of cocoa powder in the pan, tap so that all the buttered surfaces are dusted with the cocoa. Shake out any excess cocoa powder.

2. Prepare the crust. In a large bowl, whisk together the flour, sugar, and salt, and set aside. In a stand mixer with the paddle attachment, starting on low speed, beat together the butter, cream cheese, and bourbon until incorporated. Slowly add the flour mixture until ingredients are combined into a coarse crumb texture. Scrape the sides and the base of the mixing bowl halfway through to ensure that all of the butter is evenly incorporated. Press the crust into the prepared baking pan and bake for 12-15 minutes, or until lightly browned.

3. Prepare the filling. In a stand mixer on medium speed, lightly beat the eggs. Add the corn syrup, brown sugar, butter, bourbon, cinnamon, and vanilla, and mix until incorporated. Fold in the chocolate chips and pour the filling into the baked crust. Top with pecans, pressing lightly with the flat side of a spatula.

4. Bake for 20-25 minutes, or until the top is brown, the sides start to bubble, and the inside is set but slightly jiggly. Sprinkle the baked bars with the flake salt.

5. Place the pan on a wire rack to cool completely. When ready, cut into bars and serve with vanilla bean ice cream, if desired.

Tagliatelle Pasta with Roasted Delicata Squash and Crispy Sage Sauce

This beautiful fall pasta dish celebrates the often overlooked delicata squash. Creamy and sweet, this green and yellow striated squash is roasted until golden brown, then tossed with toothy tagliatelle pasta in a nutty, brown butter sauce. Topped with toasted walnuts, crispy sage, and a healthy dose of Parmesan — dinner is deliciously served!


Tagliatelle Pasta with Roasted Delicata Squash and Crispy Sage Sauce
Serves 4 - 6

Ingredients:

1 cup walnut halves
1 large, (or two small) delicata squash
4 cloves garlic, thinly sliced
2 shallots, peeled, halved, and thinly sliced
2 tablespoons olive oil
1/2 teaspoon Kosher salt
1/2 teaspoon black pepper
1/4 teaspoon crushed red pepper
1/2 cup butter
15-20 sage leaves, washed and patted dry
1/2 cup vegetable stock
2 tablespoons dry white wine
1 tablespoon fresh lemon juice
1 cup finely grated Parmesan cheese
1 lb tagliatelle pasta

Directions:

1. Preheat the oven to 350°F. Arrange the walnut halves in a single layer on a rimmed baking sheet and bake until toasted, about 5-8 minutes. Stir halfway through to ensure even cooking. Once browned and fragrant, remove walnuts from the ovenand set aside to cool.

TIP: Delicata squash does not have to be peeled, and is much easier to cut than say, wrangling a butternut squash. This makes this dish a quick-and-easy weeknight pasta! The striated green and yellow skin is tender and offers a textural depth to the dish, while the squash’s flavor is slightly sweet and nutty.

2. Increase the oven temperature to 425 degrees F. Scrub the delicata squash and cut off the stem and root ends. Halve the squash lengthwise and scrape out the seeds. Cut the squash into 1/2" wide pieces, leaving the peel on.

3. In a medium bowl, add the squash, garlic, and shallots. Toss with the olive oil, Kosher salt, black pepper, and crushed red pepper until coated. Evenly spread the mixture on a rimmed baking sheet and roast for 20 minutes, or until the squash becomes tender and begins to brown. Remove from the oven and set aside.

4. In a Dutch oven over medium-low heat, add the butter and stir constantly until it begins to turn from yellow to light brown. Add the sage leaves and cook in the butter until crisp, using tongs to individually turn each leaf so that both sides are cooked. Once crispy, remove the sage leaves from the butter and place on a paper towel-lined plate. Continue to cook the butter until it is brown and has a rich, nutty aroma. Add the vegetable stock and dry white wine. Continue to cook on a low simmer until the sauce has reduced by almost half. Remove the Dutch oven from heat and set aside.

5. Boil the pasta according to the directions and cook until al dente. Drain the pasta reserving some of the pasta water. Immediately toss the pasta in the brown butter sauce. Add the lemon juice and reserved pasta water 1/4 cup at a time as needed to coat the pasta. 6. Add in the delicata squash, garlic, shallots, and Parmesan cheese, and top with the crispy sage and walnuts. Taste and add additional salt and pepper as needed. Serve immediately.

Fall Salad with Bibb Lettuce, Shaved Fennel, Apple, Toasted Pumpkin Seeds, and a Warm Bacon Apple Cider Vinaigrette

It’s hard to strike a balance between a heavy winter salad and a light summer salad, but this one lands PERFECTLY in between! The delicate Bibb lettuce is lightly coated in a velvety warm bacon vinaigrette, while bright and crunchy celery, fennel, and apple sweeten while providing bursts of flavor. Topped with toasted pumpkin seeds and shaved Parmesan, it's hearty enough to call a meal, while still leaving room for your favorite fall dessert.


Fall Salad with Bibb Lettuce, Shaved Fennel, Apple, Toasted Pumpkin Seeds, and a Warm Bacon Apple Cider Vinaigrette
Serves 4

Vinaigrette Ingredients:

5 slices thick-cut bacon
2 tablespoons stone ground mustard
1/2 teaspoon fresh thyme leaves
2 tablespoons olive oil
1 tablespoon brown sugar
3 cloves garlic, minced
1/2 teaspoon salt
1/2 teaspoon freshly ground black pepper
1/4 cup apple cider vinegar

Salad Ingredients:

2 small heads Bibb lettuce
1 small fennel bulb, stalks and fronds removed
3 stalks celery
1 apple
1/2 cup shaved Parmesan
1/2 cup shelled, raw pumpkin seeds
1 teaspoon crushed fennel seeds
1 tablespoon olive oil
1/2 teaspoon salt

Directions:

1. Add the bacon to a large pan over medium heat and cook until crisp. Use tongs to remove the bacon and place it on a paper towel-lined plate to absorb excess bacon grease. Set aside. Once cool, chop into bite-sized pieces for topping the salad.

2. Turn the heat to low and add the mustard, thyme, olive oil, brown sugar, garlic, salt, and pepper to the bacon drippings. Whisk together until incorporated. Add the apple cider vinegar to the pan, continuing to whisk until the vinaigrette has slightly thickened. Let the dressing cool to room temperature.

3. Preheat the oven to 350 degrees F. In a small bowl, toss the pumpkin seeds in the olive oil, crushed fennel seeds, and salt, and spread the seeds in a single layer on a parchment-lined, rimmed baking sheet. Bake for 10-15 minutes, until toasted and golden. Remove from heat and set aside to cool.

4. While the vinaigrette cools, prepare the rest of the salad. Wash the Bibb lettuce and rip it into pieces. Use a mandoline to thinly shave the fennel and the celery. Core and slice the apple.
TIP: Don't forget to use a hand guard when using your mandoline to protect fingers and hands while cutting.

5. Toss all of the salad ingredients together and drizzle with the vinaigrette. Add additional salt and pepper to taste and sprinkle with the toasted pumpkin seeds. Enjoy immediately. TIP: Toss the salad for a solid minute to ensure the vinaigrette is evenly distributed among the ingredients.

Saffron & Butternut Squash Risotto with Crispy Prosciutto

Creamy, and satisfying, this saffron and butternut squash risotto is topped off with crispy prosciutto and toasted pine nuts creating a dish that captures the essence of autumn flavors! The risotto becomes extra rich and creamy with the addition of roasted and pureed butternut squash.


Saffron & Butternut Squash Risotto with Crispy Prosciutto
Serves 6

Ingredients:

1 medium butternut squash, diced into 3/8" cubes
4 tablespoons olive oil, divided
1 onion, finely diced
4 cloves garlic, minced
4 tablespoons butter, divided
2 cups arborio rice
1 cup dry white wine
4-5 cups chicken broth
1/2 teaspoon of saffron, or about 8 threads
1/2 cup parmesan cheese, grated
Kosher salt and pepper to taste

Garnish:

1-2 oz prosciutto, cooked in a pan until crispy
Parmesan cheese

Risotto Directions:

1. Preheat the oven to 400 degrees F. Place the diced butternut squash in a single layer on a large roasting pan. Drizzle with 2 tablespoons of olive oil. Sprinkle the squash with Kosher salt and pepper and roast for about 20-25 minutes or until fork tender. Stir and toss the squash halfway through the roasting process. Remove half of the squash and puree with a small food processor or immersion hand blender. Reserve the other half as cubes to be added to the finished risotto.

2. In a large Dutch oven over medium-high heat, sauté the onions and garlic in a blend of 2 tablespoons of butter and 2 tablespoons of olive oil until translucent. Add the arborio rice and stir until coated. Then, add the white wine and continue to stir until it is fully absorbed.

3. Meanwhile, in a separate soup pot, bring the broth to a simmer and separate one cup of broth into a separate bowl or measuring cup. Add the saffron to the reserved broth to infuse flavor to the broth. Set aside.

4. Once the wine is absorbed into the rice, slowly add 1-2 ladles of broth to the pot of rice, starting with the saffron-infused broth; bring to a low simmer. Keep simmering and slowly add ladles of broth (one ladle at a time). Stir continuously, until the broth becomes absorbed.

5. While the risotto cooks, prepare the crispy prosciutto. In a large skillet or braiser, heat a tablespoon of olive oil and cook the prosciutto until crispy. Remove the prosciutto once crispy and set aside on a paper towel-lined plate.

6. Continue cooking the risotto. Season with Kosher salt and pepper while stirring and adding the broth. Taste test the risotto often to ensure adequate amounts of salt and pepper are used, according to your taste. When the risotto is al dente, add 1 more ladle of the broth, stir, and turn the heat down to low.

7. Add the roasted, pureed squash and stir. Then, add the cubes of roasted squash. For a silky finish, stir in the remaining 2 tablespoons of butter and 1/2 cup of Parmesan cheese.

8. Serve hot. Garnish with the crispy prosciutto.

Butternut Squash Pancakes with Cinnamon Apple Compote

Next week it will be official -- FALL is upon us! Celebrate the changing seasons this weekend with butternut squash pancakes. Warming spices and seasonal squash kick these pancakes up a notch. Plus, when topped with our cinnamon apple compote, you'll be happily welcoming all of the season’s flavors.


Butternut Squash Pancakes with Cinnamon Apple Compote
Makes 12-15 pancakes

Butternut Squash Pancake Ingredients:
1 large butternut squash
4 tablespoons unsalted butter, melted
2 cups buttermilk
2 large eggs
1 teaspoon vanilla extract
1/2 teaspoon freshly grated ginger
2 cups all purpose flour
1/4 cup dark brown sugar
1-1/2 teaspoons baking powder
1-1/2 teaspoon baking soda
2 teaspoons cinnamon
1/4 teaspoon nutmeg
1/2 teaspoon salt
4-6 tablespoons unsalted butter, for cooking pancakes

Cinnamon Apple Compote Ingredients:
2 Honeycrisp, Gala, or Fuji apples, peeled, cored and cut into thin slices
2 tablespoons butter
1/2 teaspoon vanilla extract
1/2 cup dark brown sugar
1/2 teaspoon ground cinnamon
1/4 teaspoon salt

Pancake Toppings: Maple syrup, Butter, Pecans

Directions:

1. Roast the squash. Preheat the oven to 400°F. Rinse and dry the butternut squash. Use a knife to slice 1" holes through the tough skin all the way around the butternut squash. Place the whole squash on a rimmed baking sheet and bake in the preheated oven for 1 hour. Allow the squash to cool, then slice in half lengthwise and scrape out the seeds. Use a large spoon to remove the now tender flesh. Transfer to a food processor and puree until smooth and creamy. TIP: Add a teaspoon of water at a time to help blend the squash, if needed. Strain through a fine mesh strainer lined with a coffee filter or cheesecloth if the squash contains too much liquid.

2. Prep the pancakes. In a large bowl, whisk together 1 cup of the squash puree, melted butter, buttermilk, eggs, vanilla, and fresh ginger.

3. In a separate bowl, combine the flour, brown sugar, baking powder, baking soda, cinnamon, nutmeg, and salt.

4. Slowly add the dry ingredients to the wet ingredients, whisking together until just combined. Do not over whisk. Let the batter rest for 15 minutes.

5. Make the compote. While the batter rests, prepare the apple compote. In a medium saucepan over medium heat, combine all of the cinnamon apple compote ingredients. Stir and cook until apples are tender, about 12-15 minutes. Apples should be soft but still retaining their shape. And, the juices should have thickened. Remove from heat and set aside.

6. Cook the pancakes. Preheat a griddle or nonstick pan over medium heat. Melt 1 tablespoon of butter on the surface and scoop 1/4 cup of batter onto the hot, buttered skillet. Cook each pancake until the edges begin to brown and the surface begins to display bubbles. Flip the pancake and continue cooking until cooked all the way through. Continue with the remaining butter and batter. Makes about 12-15 pancakes.

7. Serve the butternut squash pancakes with the apple compote and top with maple syrup, butter, and pecans.

Roasted Kielbasa with Red Cabbage, Onions and Potatoes

When weeknight meal preparation gets pinched, assemble this sheet pan for a fast, flavorful, fall dinner! The combination of savory elements are delicious together and create a flavor-filled, satisfying experience. Serve with a generous dollop of whole grain mustard for dipping.


Roasted Kielbasa with Red Cabbage, Onions and Potatoes
Serves 4

Ingredients:
1 (14 oz) link of kielbasa, cut in half lengthwise, then into 3" pieces
1/2 small, red cabbage, cut into 1/2-inch thick wedge slices
1/2 sweet onion, sliced pole to pole
1 pound small potatoes, halved
1/4 cup olive oil
1 teaspoon Kosher salt
1 teaspoon black pepper
1/4 teaspoon garlic powder
5-6 stems fresh thyme

Directions:

1. Preheat the oven to 400°F. Prepare two half-sheet pans by lining with parchment paper. Use two sheet pans so that the food can be well spread out in a single layer and roasted instead of steamed.

2. Place cabbage wedges carefully as intact wedges spaced out on the two prepared sheet pans. Drizzle each wedge with a little olive oil and a pinch of Kosher salt and pepper.

3. Gently toss onions and potatoes with the olive oil, salt, pepper, thyme, and garlic powder. Stir until well-coated and then place the potatoes, cut-side down on the two sheet pans spaced out in a single layer. Add the onions around the potatoes and cabbage. Then place the pieces of kielbasa and the thyme sprigs around the pan.

4. Roast for 30 minutes, then carefully flip the sausages and potatoes. Roast for another 5-10 minutes, or until the kielbasa begins to brown at the edges and the vegetables are cooked to your desired tenderness preference.

5. Transfer the roasted collage to plates and enjoy!

Bruschetta with Eggplant, Red Pepper, Tomatoes, and Goat Cheese

Freshly grilled bread is hard to beat, but, grilled bread smeared with creamy goat cheese and a medley of grilled veggies nears perfection! This bruschetta makes a wonderful appetizer, or side dish, for an end-of-summer dinner. Try it tonight!


Bruschetta with Eggplant, Red Pepper, Tomatoes, and Goat Cheese
Serves 4 - 6 as an appetizer

Ingredients:
1 eggplant, cut into 1/4” thick, long plank slices
1 red pepper, halved
6-8 leaves basil, chiffonade cut
3 small tomatoes
1 loaf French bread, sliced
Olive oil, for brushing on bread
1 clove garlic
6 oz goat cheese

Dressing Ingredients:
2 tablespoons olive oil
1 tablespoon balsamic vinegar
1/4 teaspoon dried oregano
1/4 teaspoon Kosher salt
1/4 teaspoon freshly cracked pepper
1 teaspoon Dijon mustard

Directions:
1. Cut the eggplant into long plank slices about 1/4-inch thick -- no need to peel. Halve the pepper. Drizzle both the eggplant slices and the pepper halves with olive oil, Kosher salt, and pepper. Prepare a medium-hot grill, and grill the eggplant slices for 3 - 4 minutes on each side, or until golden brown. Remove the eggplant from the grill, and cut into a 1/4-inch dice.

2. Grill the pepper halves until slightly charred and tender, also for about 3 - 4 minutes per side. Remove the pepper from the grill. Place the pepper halves in a paper bag or covered bowl for a few minutes, this will allow you to easily remove the pepper’s peel after a few minutes of cooling. Once cooled, peel away the pepper’s skin and then cut into a 1/4-inch dice.

3. While the vegetables grill, prepare the dressing by whisking all of the ingredients together in a small bowl.

4. Slice the basil into a fine chiffonade cut. Do this by stacking clean basil leaves together, then rolling them up the long-way. With a sharp knife, slice the roll with narrow cuts to produce finely sliced shreds.

Spicy Grilled Scallops with a Corn, Bean, and Radish Salad

Grilled scallops are a summer menu must, and are a cinch to prepare. This recipe brings on the heat from both the grill and the ingredients! Sweet and pillowy scallops are skewered, grilled, and served alongside a warm roasted corn, radish, and white bean salad that will have you savoring these long summer days with every bite.


Spicy Grilled Scallops with a Corn, Bean, and Radish Salad
Serves 4 - 6

Scallop and Marinade Ingredients:
2 tablespoons olive oil
1 tablespoon honey
2 cloves garlic
1 teaspoon smoked paprika
1/4 teaspoon Kosher salt
1/4 teaspoon black pepper
1-1/2 lbs. sea scallops, side muscles removed

Grilled Corn, Bean, Radish Salad Ingredients:
2 ears corn, shucked
3 tablespoons olive oil, divided
10 radishes, washed and quartered
1 tablespoon butter
1 can (15 oz) navy or cannellini beans, drained and rinsed
1 small fresh jalapeño pepper, seeds and ribs removed, finely sliced
1 small shallot, thinly sliced
1 teaspoon Aleppo pepper
1/2 teaspoon Kosher salt
1/4 teaspoon black pepper
2 tablespoons fresh lime juice
Zest of one lime
1/2 cup fresh cilantro, chopped
1/4 cup fresh green onion, sliced

Serve with:
1 loaf ciabatta bread, sliced, brushed with olive oil, and grilled

Directions:
1. Soak the wooden skewers 1 hour prior to grilling. Mix the olive oil, honey, garlic, smoked paprika, salt and pepper in a medium bowl. Rinse and pat the scallops dry.

2. Toss the scallops in the marinade, cover with plastic wrap, and refrigerate for 30-45 minutes. Do not marinate for longer than one hour.

3. Preheat the grill to medium high heat. Place the ears of corn in aluminum foil, drizzle with 1 tablespoon olive oil, and seal. Place the quartered radishes in aluminum foil, drizzle with the remaining olive oil, and seal. Grill the packets for 15 minutes or until cooked. Remove from heat. Once cool enough to handle, remove the the corn kernels from the cob.

4. Grill the bread. Use a pastry brush to brush the bread slices with olive oil on both sides. Place on the grill over indirect heat and grill until golden and crisp, about 2 minutes.

5. Double skewer the scallops -- 3 per skewer. Work quickly -- the scallops will grill more easily if they are cold. Repeat until all the scallops have been skewered. Brush the grill grates with olive oil to avoid the scallops from sticking. Grill scallops for 4-6 minutes, flipping half way through with grill tongs.

6. In a large skillet, over medium heat, warm the remaining tablespoon of olive oil and butter over medium heat. Add the beans, pepper, shallot, Aleppo pepper, salt, and black pepper. Cook, stirring occasionally until the beans are warm and have been well-coated. Remove from heat.

7. In a medium bowl, toss the cooked beans, radishes, and corn together in a bowl with the lime juice, lime zest, and cilantro and an additional drizzle of olive oil.

8. Enjoy the scallops with the corn, radish, and bean salad. Garnish with green onion, flake salt, and black pepper. Serve with the grilled bread.

Honey-Mustard, Bone-in Pork Chops with Nectarine Sauce

These bone-in pork chops are incredibly juicy and flavorful! The secret? -- a brining step that locks in the juices, and ensures tenderness to the last bite. And, as good as these chops are on their own, the nectarine sauce is a deliciously sweet and savory finish! The sweetness from the honey and nectarines is perfectly balanced with white wine and garlic additions. With just a little bit of easy prep, you’ll find that this bold entrée is perfect for summertime entertaining.


Honey-Mustard, Bone-in Pork Chops with Nectarine Sauce
Serves 4

Ingredients:
4 large pork chops, bone-in

Brine:
6 cups ice water
1/4 cup Kosher salt
1/4 cup sugar
2 sprigs of thyme

Honey-Mustard Wet Rub:
2 tablespoons stone ground mustard
2 tablespoons honey, kosher salt and pepper

Nectarine Sauce:
2 cups nectarines (about 2 large nectarines), pitted and diced
3 tablespoons butter
2 cloves garlic, finely minced
2 sprigs of thyme
1/2 cup white wine
1 tablespoon honey
1/8 teaspoon Kosher salt

Directions:

1. Make the brine by stirring together the ice water, Kosher salt, sugar, and thyme in a large bowl. Add the pork chops, cover and refrigerate for 1 hour.

2. Meanwhile, prepare the honey-mustard wet rub in a small bowl by whisking the honey and mustard together.

3. Remove the pork chops from the brine, and pat dry with a paper towel. Sprinkle both sides with freshly ground pepper, and a light dusting of Kosher salt. Then, rub all sides of the chops with the honey-mustard wet rub until evenly coated. Let the chops set out at room temperature for 30 minutes before grilling.

4. While the pork chops are warming, prepare the nectarine sauce. Using a serrated peeler or paring knife, carefully remove the skins from 2 large nectarines, then finely dice. In a medium-sized saucepan, melt the butter over medium-high heat. Add the garlic, stir, and cook for about 2 minutes, or until the garlic is fragrant. Add the thyme, wine, honey, and diced nectarines. Bring the sauce to a low simmer, and cook for about 20-30 minutes or until the wine reduces and the sauce thickens. Use the back of a spoon or a potato masher to mash the fruit as it cooks. Season with Kosher salt and pepper, to taste. Remove the thyme stems before serving.

5. Fire up the grill! Place the marinated pork chops on a hot, well-oiled grill, and sear for 3 minutes on each side. Then, turn off one burner (or turn to low) to create a direct/indirect environment. Place the seared chops on the cooler, indirect side, and continue grilling until their internal temperature reaches 145 degrees F.

6. Once the pork chops reach 145 degrees F, place on a clean plate, and cover loosely with an aluminum foil "tent" for about 10 minutes. This allows the meat to rest, while continuing to cook to a perfect, juicy medium temperature.

7. Serve the pork chops with spoonfuls of nectarine sauce on top. If you'd like, serve with a simple side salad. Gently toss arugula, raspberries, goat cheese, and grilled nectarine halves with our bright Mustard-Lemon Vinaigrette: 3 tablespoons olive oil, 1 tablespoon champagne vinegar, 2 tablespoons fresh lemon juice, 1 teaspoon stone ground mustard, 1 teaspoon honey, Salt and pepper to taste.